Folding Corners
This tutorial will show you how to make the folding corners on pages, documents etc…very simple method but gives a great end result, adds a dynamic effect to images and can be used for things such as posters or books etc…
Step 1 - Open New Document
First of all as usual open a new document (or an existing project) any size you want, but for the sake of this tutorial I used 800 x 800, when this is done fill the background with a desired colour.
Step 2 - Draw The Shape
In this tutorial I want to create the effect of a piece of paper with a folding corner so I pick the rectangle tool and set the foreground colour to white (#FFFFFF) and draw a reasonably sized rectangle in the centre of the document as shown below,

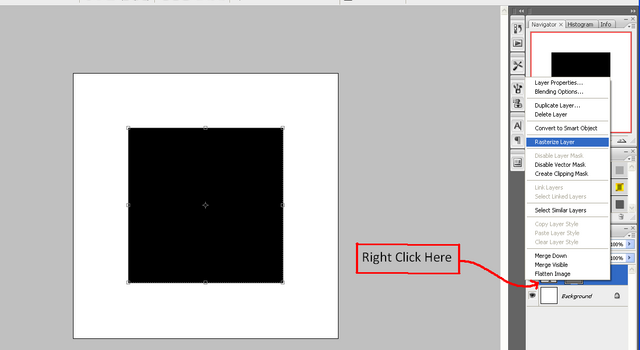
Step 3 - Rasterize Shape
Next you need to rasterize the shape, to do this right click on the layer in the layers tab and choose rasterize layer as shown below:

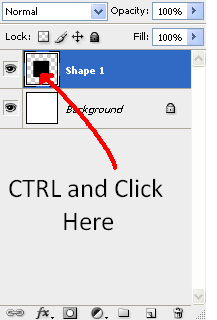
Step 4 - Polygonal Lasso Tool
This is the good part, first of all CTRL + Click the box next to the shape layer in the layers tab which shows a preview of the layer, this should bring up the crawling ants around the shape, next choose the polygonal lasso tool, and make sure it is set to subtract from the material, the two icons of which are shown below:
Polygonal Lasso Tool:
![]()
Subtract From Selection:
![]()
When these two options are selected draw around the shape as shown below (the polygonal lasso tool works in a similar sort of way to the pen tool with the way you draw with it as shown in THIS tutorial)

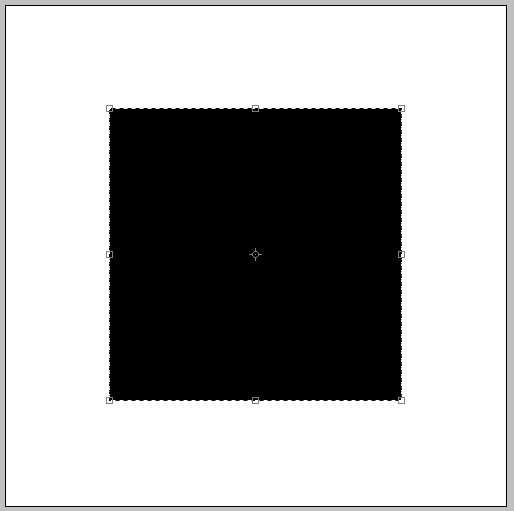
When the two end points are connected together the corner of the page should have the crawling ants around it now simply press delete on the keyboard (make sure the shape layer is selected) and this will delete the corner of the document and will leave you with this result:

Step 5 - Making The Fold
First deselect the corner (CTRL + D) and then CTRL + Click the shape layer again so the crawling ants are around your whole shape again, then choose the Rectangular Marquee Tool and choose intersect with selection which is the option on the right hand side of the subtract from selection, now draw a box as shown below:

And it should create a new corner, at this point press CTRL + SHIFT + N to create a new layer, and the choose the gradient tool and use the colours and positions below:

Now press OK and draw the gradient starting from the middle of the corner to the bottom left:

And this should give you a nice shadowy effect dont worry if it’s a bit dark we will sort that out nearer the end, now grab the eliptical marquee tool and make a selection the same as the below image or something similar (Note: make sure it is set to subtract from selection):

And it will cut out that bit of the corner and make it look curved, now press CTRL + SHIFT + I to inverse the selection and press delete, this will delete the bit of the corner that we don’t want (Note: Remember to press CTRL + SHIFT + I again after to reselect the corner)

And now do the same thing to the left side of the corner but not as big but make it so it shows a slight curve.
Step 6 - Blending Options
Now to add the Blending Options (Double click the layer in the layer tab) to the folded over corner this is simply just a drop shadow, but use the settings below to get the best effect:

Step 7 - Finishing Touches
Just a couple of finishing touches to make the page look better, if the corner is a bit dark just set the Opacity to 50% and this will lighted it up as I have done on mine, also you could add a drop shadow to the main page aswell to make it look like it is coming off the background:
Change Opacity:

And then this will give you the final image as shown below:
Finished

If you have any problems with this tutorial then don’t hesitate to leave me a comment or email me at: stevie489@googlemail.com and I will help you as much as I can.