This tutorial is more for the beginners of Photoshop on how to use the pen tool and what you can do with it, although some more advanced with Photoshop may also find this useful, it is just a quick tutorial today as I am currently working on a new WordPress layout for this website so I am quite occupied with that, but I will still be doing tutorials every other day whilst I am doing this.
Step 1: First of all find the image that you want to use in this tutorial; I have used a picture of a Buggati Veyron and open it up in Photoshop, now choose the pen tool on the left toolbar (as shown below) but before we use it I am going to explain what it does and the benefits of using it:
Original Image:
Pen Tool
The pen tool allows you to make “paths” which can be used to cut out certain parts of images or so that you can make a range of different shapes.
Advantages of Using the Pen Tool
The pen tool offers more flexibility over other tools (e.g. Polygonal Lasso Tool) because the pen tool not only creates anchor points but when you have clicked where you want the anchor point to be, if you hold down the button and drag you can create a curved shape which can be used to draw around curved objects.
Step 1 (Continued…): Now back to step 1, with the pen tool selected at the top of the window you will see the below toolbar which shows the settings of the pen which can be used, if you hover over each setting it will explain what they do, for now use the settings below and you can experiment whenever you want to:
Step 2: Now zoom into your image and click on the canvas around the edge of your chosen object, this is the starting point of your selection now when you click at the next point in your object notice that it makes another small square (You might notice you can’t click on the adjustment bar ends. That is, until you hold the CTRL key. When you hold the CTRL key, your cursor will change to a solid white arrow, the Direct Selection Tool. Now you can click on the adjustment bar ends and adjust the curve of your selection. Now try holding the ALT key. You should get a two-sided arrow when you mouse over your adjustment ends, the Convert Point Tool. Click and drag to adjust only one aspect of your curve. This is how you make sharp edges with your Pen Path.) Now keep clicking around the edge of your chosen object and remember if you want a curved line, click and hold and then drag in the direction of the curve.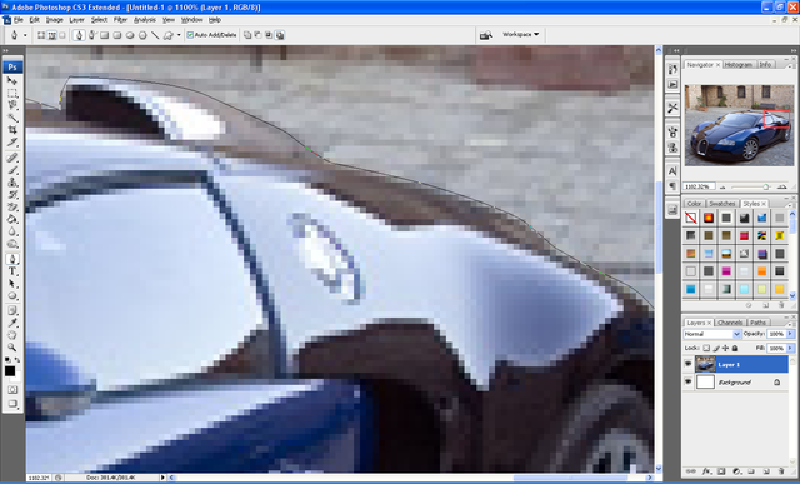
Step 3: When you get the hang of it, it is really easy to use, once you have gone around the whole outer edge of your object join the starting point and ending point together, you will now have a “Path”
Step 4: Now right click in the path and choose “Make Selection” as shown below,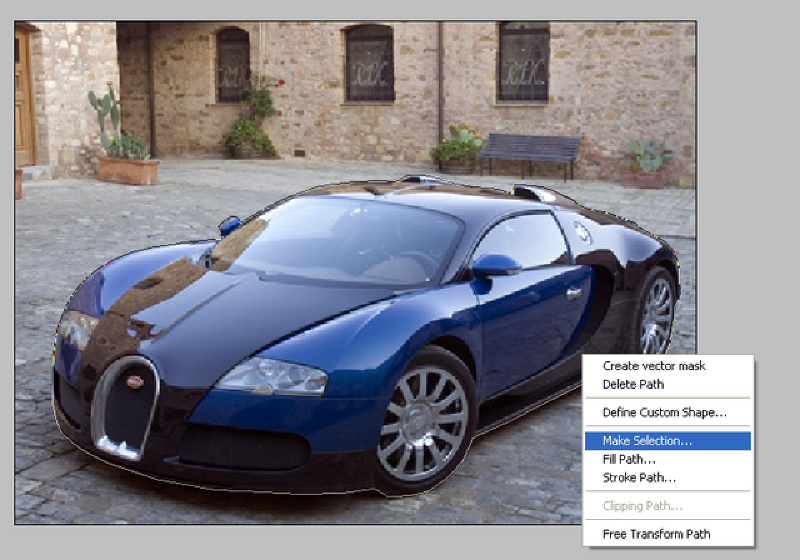
Step 5: This will bring up a menu showing some different settings, but leave this as default as they don’t need to be changed.
Step 6: With your path now selected you will see the crawling ants around the edge of your image, now when you choose the move tool you can see that your selection can be moved around etc…Now open up a new background in a new document and simply drag and drop your selection into it as shown below:
Crawling Ants:
Drag And Drop:
Step 7: You can now play around with different shadows and options to get just the right look and once I had done this I had something that looked similar to below:
(This final image does look rubbish but that was not the point of this tutorial, the point was to show you that there are other ways to extract an image rather than using the eraser or magic wand tool, if I had more time i would have made this final image look better, but it will do to illustrate my point)
Finished:
This tutorial was just the basics of using the Pen Tool but there are lots of other different things which it can be used for, so go and play around with it and see what you can create.
If you have any problems with this tutorial then don’t hesitate to leave me a comment or email me at: stevie489@googlemail.com and I will help you as much as I can.
Type Query Here

Showing posts with label Basics. Show all posts
Showing posts with label Basics. Show all posts
Wednesday, 9 April 2008
Using The Pen Tool - The Basics
Subscribe to:
Posts (Atom)